Table of Contents
- Signs of Broken Garage Door Springs
- Torsion vs Extension Springs: Know the Difference
- Tools and Safety Gear Required for Spring Replacement
- Step-by-Step: How to Safely Replace Garage Springs
- Garage Door Spring Life Cycle: When to Replace
- DIY vs. Professional Replacement: A Cost-Benefit Analysis
- Conclusion
- Frequently Asked Questions
Last Updated: September 9, 2026
Garage door springs carry the entire weight of the door, and when one snaps, the result is a loud bang and a door that won’t budge. Knowing how to safely replace garage springs is essential for any homeowner attempting this repair, because a single mistake with a high-tension coil can cause serious injury. At Garage Door Pro in Carmel, this guide prioritizes your safety above all else.
Below, we’ll walk through the signs of failure, the critical differences between spring types, and a step-by-step process for how to safely replace garage springs. We will also cover when the risk simply isn’t worth the reward and why calling a professional is often the smartest decision you can make.
Signs of Broken Garage Door Springs
The most obvious sign of a broken garage door spring is a door that refuses to open, or one that lurches violently when it does. You might also hear a loud snapping noise from the garage, which is the sound of the spring fracturing under immense torque.
Other common indicators include a door that is extremely heavy to lift manually, or one that falls quickly when you try to lower it. If you notice a visible gap in the coil or the spring appears stretched out, it has failed. A garage door with a broken spring is a safety hazard because the counterbalance system is compromised, and the door could come crashing down unexpectedly.
Torsion vs Extension Springs: Know the Difference
Before you buy parts or pick up a wrench, you must correctly identify your spring system. A misdiagnosis here isn’t just a wasted trip to the hardware store, it’s a safety hazard. The two systems store energy in completely different ways, and the removal and installation procedures are not interchangeable. Here is how to tell them apart from a quick visual inspection.
Visual Identification Guide
- Location: Mounted on a metal torsion tube (shaft) directly above the door header, parallel to the wall.
- Appearance: Tightly coiled, cylindrical springs that sit side-by-side on the shaft. You will see a stationary cone at one end (bolted to the header) and a winding cone at the other end with holes for winding bars.
- Cables: The lift cables wind around cable drums located at the ends of the torsion shaft.
- Common in: Most homes built after the mid-1980s and any home with a door header clearance of at least 6 inches (garagejournal.com).
Extension Springs:
- Location: Mounted horizontally above the top track on both the left and right sides of the door.
- Appearance: Long, loosely coiled springs that stretch and contract. They are often painted (frequently yellow or red) to indicate their weight rating.
- Safety Cables: A critical safety feature, a separate steel cable runs through the center of the spring and is anchored to the wall and the track. This prevents the spring from becoming a projectile if it snaps.
- Pulleys: You will see pulleys at the front of the tracks where the lift cables route over.
Why the Distinction Matters for Your Safety
The danger profile is different for each system. A torsion spring is under extreme torque, it is twisted tightly to store energy. When it fails or is mishandled, the release is a violent rotational force that can spin a winding bar out of your hands and break bones. An extension spring, on the other hand, is under extreme tension, it is stretched. If it breaks or a tool slips, the spring contracts with explosive force, whipping toward the front of the garage.
If you have a torsion system, you will need winding bars. If you have an extension system, you will need a different procedure involving C-clamps and a method to safely relieve tension from the pulley system. Knowing which one you have dictates your entire tool list and procedure, so do not skip this step.
Tools and Safety Gear Required for Spring Replacement
Attempting this repair without the right equipment is a recipe for disaster. You will need specific tools designed to handle the immense force of the spring.
- Winding bars: These are mandatory for torsion springs. Never use screwdrivers, as they can slip and cause severe lacerations.
- Locking pliers (Vise-Grips): Used to clamp the track to keep the door from moving.
- Socket wrenches: For removing the bolts on the spring anchor bracket and cable drums.
- Safety equipment: You must wear safety glasses and heavy work gloves.
Step-by-Step: How to Safely Replace Garage Springs
This process outlines the general procedure for a standard torsion spring system, which is the most common configuration in modern homes. This is a high-risk procedure. If you feel uncertain at any point, stop and call a professional. The process requires precision, physical strength, and a strict adherence to safety protocols. The consequence of error is severe injury..
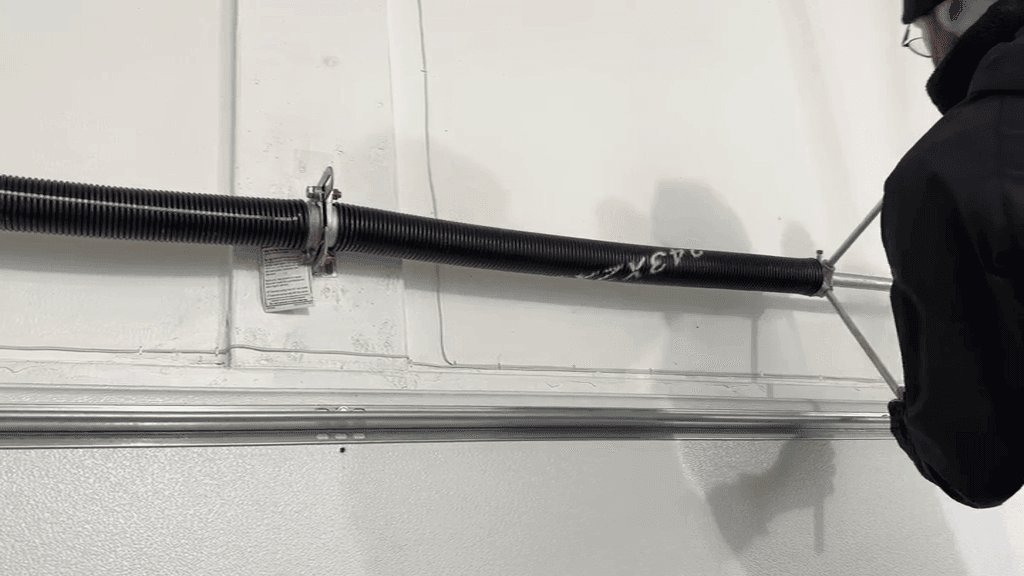
Step 1: Release Tension and Disconnect the Opener
- Disconnect Power: Unplug the garage door opener from the ceiling outlet. This prevents any accidental activation while you are working on the door.
- Release the Door: Pull the emergency release cord (the red handle) to disengage the carriage from the opener trolley. You should now be able to move the door by hand.
- Secure the Door: Manually lift the door to about halfway open. Take two locking pliers (Vise-Grips) and clamp them onto the vertical track, just above the top roller on both sides. This creates a solid physical stop, preventing the door from falling or being pulled up while you work on the springs.
Step 2: Remove the Old Springs
- Insert the First Winding Bar: Locate the winding cone on the end of the spring. Insert one winding bar into the bottom-most hole of the cone. Hold it horizontally and firmly.
- Insert the Second Bar: Insert the second winding bar into the next hole, which will be at a 90-degree angle to the first. This second bar is your ‘cheater’ bar for control.
- Release Tension Incrementally: This is the most critical step. Do not loosen the set screws yet. Using the second bar, push down to rotate the cone in the direction that unwinds the spring (typically a quarter-turn at a time). You will feel immense resistance. After each quarter-turn, remove the second bar and re-insert it into the next hole to maintain control. Continue this process until the spring spins freely on the shaft, indicating zero tension. You will notice the spring has expanded in length as you release the torque.
- Loosen Set Screws: Once the spring is free-spinning, use a socket wrench to loosen the set screws on the winding cone. Do not remove them completely; just loosen them enough to slide the cone off the shaft.
- Slide the Spring Off: Slide the entire spring and the stationary cone off the torsion shaft. Be careful, as the spring is heavy.
Step 3: Install and Wind the New Springs
- Prepare the New Spring: Confirm your new spring matches the old one in wire gauge, inside diameter, and length. A mismatch will cause the door to be unbalanced and fail prematurely.
- Slide on the New Spring: Slide the stationary cone onto the torsion shaft first, then the spring. Position the spring so the stationary cone is against the center bearing plate. Tighten the set screws on the stationary cone firmly to the shaft.
- Attach the Winding Cone: Slide the winding cone onto the shaft at the end of the spring. Ensure the spring is seated correctly in the grooves of both cones.
- Wind the Spring: This is the most dangerous part of the entire process. Insert your winding bars into the winding cone. The number of quarter-turns required is determined by the door height and spring gauge. A standard 7-foot high door typically requires 30 to 36 quarter-turns (diy.stackexchange.com). Do not guess. Use the chart provided with your spring or consult the manufacturer’s specifications. Wind the spring by pushing the bar in the direction that tightens it, maintaining a firm grip and keeping your body to the side of the bar, never directly in front of it. After each quarter-turn, re-insert the second bar to maintain control.
- Tighten Set Screws: Once the correct number of turns is achieved, tighten the set screws on the winding cone with a socket wrench to the manufacturer’s specified torque.
Step 4: Balance and Test the Door
- Remove Locking Pliers: Carefully remove the locking pliers from the tracks.
- Reconnect the Opener: Reconnect the carriage to the opener trolley and plug the opener back in.
- Manual Balance Test: Pull the emergency release cord again. Manually lift the door to about halfway open. If the door stays in place without falling or rising, the spring tension is correct. If the door falls, you need more tension (more turns). If it rises on its own, you have too much tension (fewer turns).
- Full Cycle Test: If the balance is correct, reconnect the opener and run a full open and close cycle. Listen for any unusual noises, such as grinding or popping, which could indicate a misaligned spring or a problem with the cable drums.
Proper balance is not just about convenience; it ensures the door’s cycle life is maximized and prevents undue strain on the opener, which can lead to premature failure of the motor and gears.
Garage Door Spring Life Cycle: When to Replace
Garage door springs are rated by cycle life, where one cycle equals one open and close operation. A standard torsion spring typically lasts between 10,000 and 15,000 cycles, which translates to roughly 7 to 10 years of normal use for a single-car garage. If you use your door multiple times a day, the life expectancy drops significantly.
If you are replacing a broken spring, it is highly recommended to replace both springs at the same time, even if one appears intact. The remaining spring has endured the same stress and will likely fail soon. Preventative maintenance, such as lubricating the springs and checking the cable drums, can extend the life of your system.
DIY vs. Professional Replacement: A Cost-Benefit Analysis
While a DIY kit costs less upfront, the hidden costs are your safety and time. The primary benefit of hiring a professional is the assurance that the job is done safely and correctly. Professionals carry the correct springs for the door weight and have the experience to handle unexpected issues, like damaged cable drums or bottom brackets.
Many homeowners in Carmel search for “garage door spring replacement near me” after a failed DIY attempt. Technicians at Garage Door Pro arrive with the necessary parts on the truck, meaning most jobs are completed in a single visit. When you factor in the risk of injury and the cost of tools, professional installation is often the most economical and safest choice.
Conclusion
Learning how to safely replace garage springs is possible, but the risk of severe injury is real. The high-tension stored in these coils demands respect, and a small mistake can lead to a trip to the emergency room. While this guide provides a framework, it cannot replace the hands-on experience of a trained technician.
If you are in Carmel or the greater Indianapolis area, the team at Garage Door Pro offers same-day service with a fixed total cost provided before any work begins. Our veteran-owned business holds an A+ BBB accreditation, and we handle the parts warranty directly. Don’t risk your safety for a repair that requires precision and specialized tools. Contact Garage Door Pro today for a free quote and let our skilled technicians restore the smooth, safe operation of your garage door.
Frequently Asked Questions
Can I replace my garage spring myself?
While it is possible to replace garage springs yourself, it is one of the most dangerous DIY tasks on a home. The springs are under immense tension and can cause severe injury or property damage if they slip. If you have the correct tools, including winding bars, and understand the process, you can do it. However, for most homeowners, the risk is not worth the potential savings.
How many years do garage door springs typically last?
A standard garage door spring life cycle is typically 10,000 to 15,000 cycles, where one cycle equals one open and close. Depending on how often you use your door, this translates to roughly 7 to 10 years for an average household. If you use your door multiple times a day, you may need a replacement sooner.
Should you replace both garage springs at the same time?
Yes, you should always replace both springs at the same time, even if only one is broken. The other spring has gone through the same number of cycles and is likely near the end of its life. If you only replace one, the new, stronger spring will cause uneven lifting and put extra strain on the older one, leading to another failure soon.
What are the risks of DIY garage door spring replacement?
The primary risk is the high-tension stored in the springs. A slipping winding bar or incorrect tension release can cause the spring to snap, acting like a whip. This can lead to broken bones, lacerations, or even death. Additionally, improper installation can cause the door to become unbalanced, which can damage the opener or cause the door to fall suddenly.